Let’s get started
It’s good to know that Shopify actually adds a default blog to every online store on its platform. This blog section is called News and it allows you to start blogging right away. But you can also choose to add a custom blog to your Shopify store if you prefer that. We’ll discuss both options here.
Use the default News blog on Shopify
When you have an online store on Shopify, you automatically get a blog section with the name News. Just login to your Shopify admin and click on Online Store in your Sales channels section. Clicking on that will open up a menu below, where you can click on Blog posts. This brings you to the default blog section where you can start adding blog posts right away.
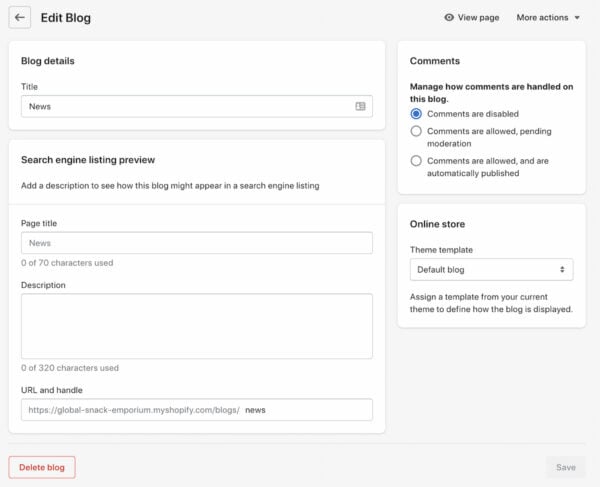
In the Blog posts section, you can also make a few changes to this default blog by clicking Manage blogs at the top of your screen. Clicking this button brings you to an overview of the blogs that are on your Shopify store right now. Simply click on the blog you want to edit, the default News blog in this case, and it will bring you to a screen where you can make a few changes to your blog.
You can change the title of your blog, how comments are handled, and choose a template for the appearance of your blog. In addition, this page gives you a preview of how your blog might appear in the search results. By clicking on Edit website SEO, you can actually fill in what title, description and URL you would like to see appear in the search results. Although there’s no guarantee, there’s a reasonable chance that Google (and other search engines) will adapt these details. So it’s worth filling in these fields.
Add a custom blog to your Shopify store
It’s also possible to add another blog to your online store. Log in to your Shopify admin, click on Online Store in your Sales channels section and click on Blog posts in the menu that appears below Online Store. This takes you to an overview of the current blogs on your Shopify store. In the top right corner, you’ll see the button Add blog, which brings you to a screen that is very similar to the one in the screenshot above. Here you can fill in the title of your blog, how comments should be handled and choose a template for your blog. It’s also possible to fill in some information that the search engines can use to display your blog in the search results. Just click on Edit website SEO and fill in the fields that appear.
How to create your first blog post
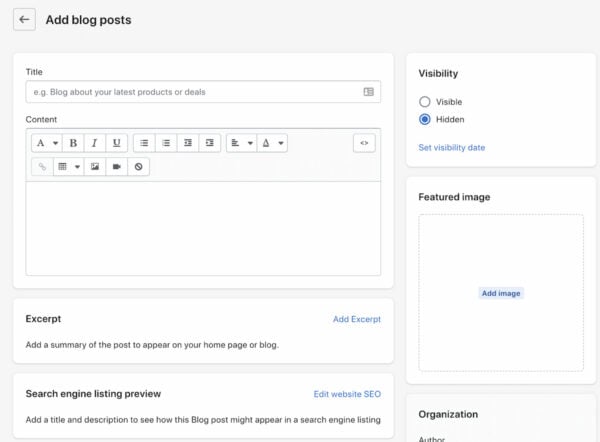
After you’ve made the necessary changes to the default blog or added a new blog to your Shopify store, you can start writing your first blog post. Go back to the Blog posts section and click the Add blog post button at the top right corner. This will take you to a new screen where you can start writing your blog post.

The fields on this page probably speak for themselves. You can write your blog in the Content section and don’t forget to add a title, excerpt and featured image. Also, make sure to change the visibility to visible when you want your post to show up on your website and don’t forget to click Edit website SEO to fill in the fields in the listing preview. When you scroll down a bit, you can also change the author and add tags to your post. After you’ve written your blog post and filled in everything you need to, don’t forget to click Save.
How to write blog posts that attract visitors
So far, we’ve explained how to add a blog to your Shopify store and how you can write your first blog post. But although it’s good to be enthusiastic, we wouldn’t recommend just publishing posts on whatever you can think of. You want to make sure you’re writing on a regular basis, about topics that your audience is interested in. Here are a few tips to start off the right way!
Start with keyword research
Of course, you can always write about stuff that you’re interested in and stuff that’s related to your products or services. But before you start, you should definitely conduct some keyword research. Keyword research helps you figure out what your audience is searching for online and what topics they’re interested in. You can use this input to tweak your list of blog ideas to make sure that your audience is able to find your content and actually lands on your website. We have an article on keyword research for your online store that can help you find the right topics for your blog posts.
Create a content calendar
When you have an online store, it can be tricky to create new content on a regular basis. We get that. But it is essential to keep it up, as it can really increase the traffic to your website. And it shows Google that your website is alive and kicking. A good way to make sure that you’re spending enough time on content creation is by having a content calendar.
Use an Excel sheet, or a service like Trello or MeisterTask, to create this calendar. Whatever works for you and your team. This will allow you to keep an overview of your ideas and set due dates to make sure you’re adding new content to your blog on a regular basis. Just make sure to set realistic goals for yourself. If you’re struggling with writing multiple posts per week, bring it back to one per week. Try to find a balance that works for you and your website.
Write user-centered content
You now have all the basics to get started on your first post. But how can you make sure that it will be any good? That you’re spending your time on content that will attract people to your website and keep them there? The most important thing is that you create content that is relevant and readable for your audience.
Doing keyword research helps you figure out what your audience is interested in. But you also need to keep your user in mind while writing. Don’t just push your products, but write content that solves the problems that your audience is facing. Build trust between you and your audience by giving them tips and helping them out. If you sell garden tools, don’t just use your blog to tell people about your latest hand trowel, but blog about how to maintain your garden during every season. Your audience will probably consist of people who love gardening and that will look for those kinds of tips. They will view you as a garden expert and trust that your products will help them maintain their beloved plants and flowers.
Readability is another important factor when it comes to content creation. You want to make sure that people enjoy your writing style and get to the end of your blog post (or at least further than the introduction). Just having a ‘wall of text’ on your page will scare people off. That’s why you should make sure to use enough headings, divide your text up into paragraphs and write in an active voice. The Yoast SEO for Shopify app actually comes with a readability analysis that gives you actionable feedback while you write. This app also helps you optimize your content for search engines, which we’ll explain next.
Write SEO-friendly content
Have you heard of SEO? It stands for Search Engine Optimization. This is the practice of optimizing your web pages to make them reach a high position in the search results of Google and other search engines. This is how adding a blog to your Shopify store can help you attract more people to your website. Because a lot of people are searching online nowadays and it really pays off to be one of the top results, not only in site visits but also in sales you make.
By writing blog posts that help your audience and show up high in the search results, you’re creating content that will lead to more customers and a growing business. But that does mean that your content and pages need to be SEO-friendly. Writing user-centered content is already a great start, but there’s more you can do. You can find most of it in our ultimate guide to Shopify SEO, but we would also like to mention our Yoast SEO for Shopify app. This app makes sure your online store meets the highest technical SEO standards and provides you with useful feedback while creating product pages and blog posts.

I have to thank you for the efforts youve put in writing this blog. Im hoping to check out the same high-grade blog posts by you later on as well. In fact, your creative writing abilities has encouraged me to get my own website now 😉